I recently noticed that the fraction circles and fraction strips on the website showed some inconsistencies and needed improvement. If you aren’t familiar with these manipulatives, they are generally used for learning about fractions and often for comparing fractions. With some creativity, they can be used for a wide variety of activities, some of which I’ll suggest later. Fraction strips are wide rectangles (strips) that are all the same length, but they are divided into different fractional sections. Each strip is worth one whole, but they are divided into the same number of sections as the denominator of the fraction. For example, the thirds strip is divided into three segments and the tenths strip is divided into ten segments. Fraction circles are much the same except they are circular and the fractions are pie-shaped sections (circle sectors). To view all of the fraction strips and fraction circles visually, visit the search page on Math-Drills.

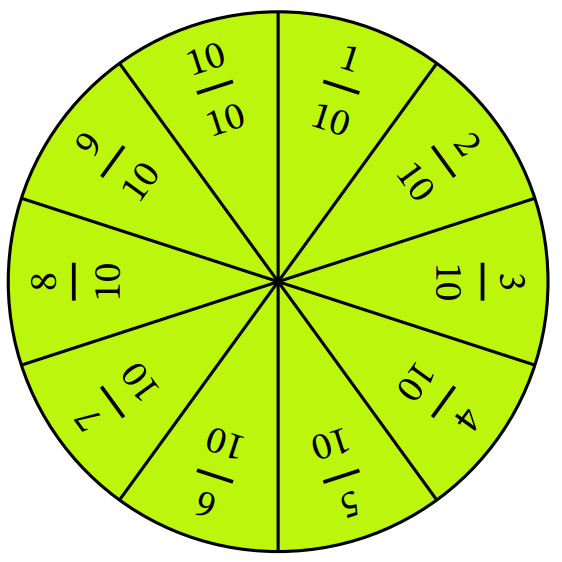
The tenths strip and the tenths circle are shown for comparison.
Colors
One of the major changes in both the fraction strips and fraction circles was the coloring. Previously, there were black and white and color versions, but I thought the black and white version lacked contrast to the background of the page, so I also made a gray version. Of course, the black and white versions are still quite valuable as you or your students can color them for your own purposes and activities (see further down). The color versions use a color scheme that was developed by Sasha Trubetskoy which was a God-send because creating a color scheme is a really difficult thing to do! Twenty different colors that when compared to each other are different enough to be distinguishable is no easy task. Educators should always keep in mind, however, that a significant portion of the population is color-blind to some degree, so care must be taken when asking anyone to distinguish colors.
Smart Fraction Strips
The “classic” fraction strips on the website are presented in numerical order of their denominators, but I thought it would be interesting to also have a version with a “smart” order: one that showed similar strips adjacent to one another. The order of the denominators on the “smart” fraction strips is: 2, 4, 8, 12, 16, 20, 15, 10, 5, 3, 6, 9. The idea was to have a group that included 2, 4, 8, 12, 16, 20; a second group that included 20, 15, 10, 5; and a third group that included 3, 6, 9. Sevenths and elevenths aren’t included on the smart fraction strips as they don’t play well with the other strips, so it wouldn’t be smart to include them. Of course, if they are cut out, you can put them in all sorts of different orders!
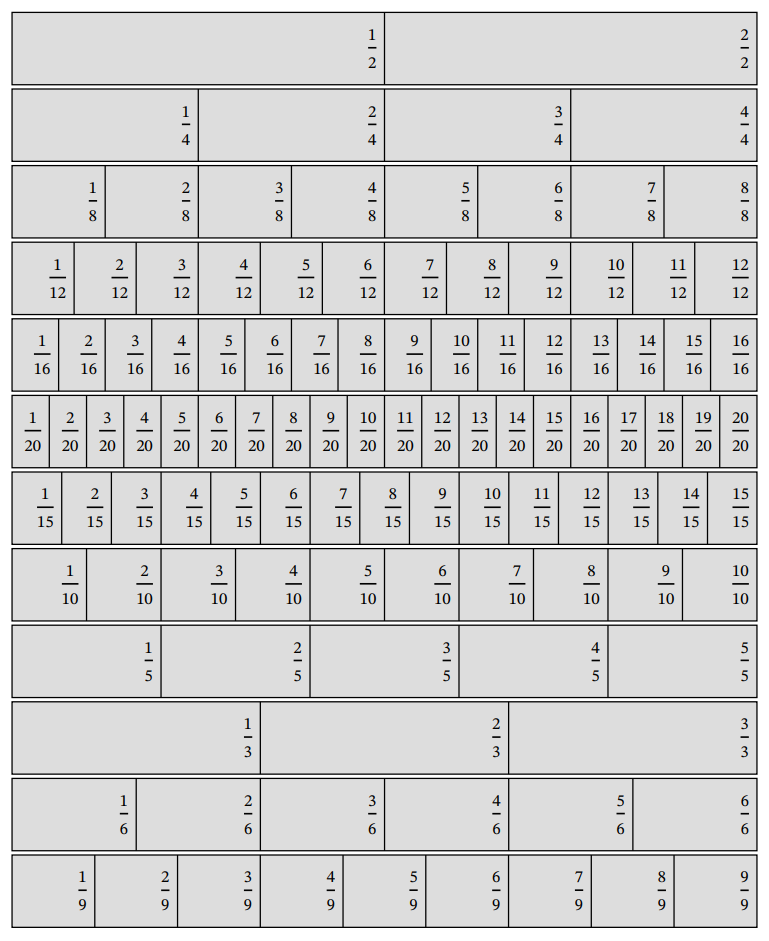
You may also notice that there is no strip for one whole. After much thought and consideration, I excluded it as every strip is worth one whole and I could use the extra space to include another fraction strip. In the case of the classic fraction strips, twentieths were included as they have more fractions in common with the other strips than say, sixteenths. The smart fraction strips include fifteenths, sixteenths and twentieths.
Labels
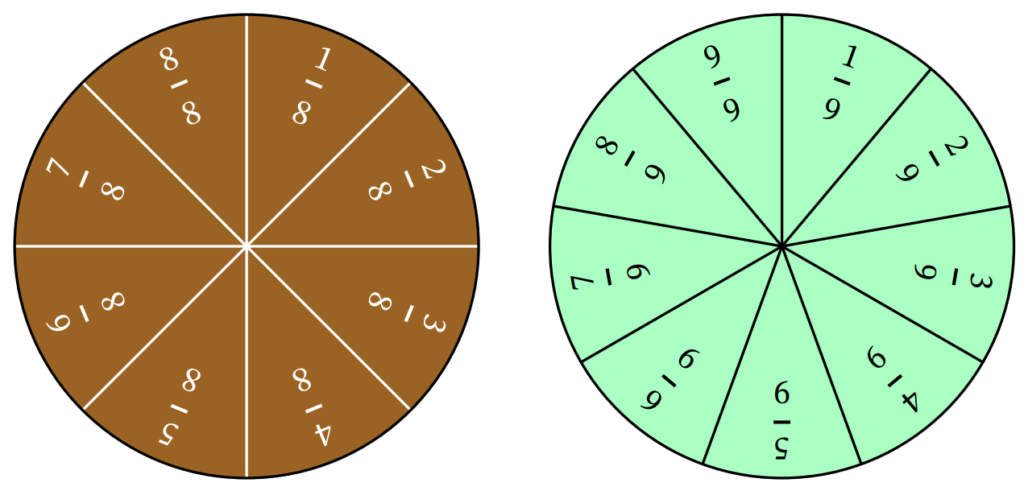
The old strips and circles had labeled and unlabeled versions and so do the new ones. I had a bit of a struggle with the circles deciding whether I should rotate the text around the circle (I did) and whether the numerators should be incremented (also did). Those two items were not implemented on the old versions, so hopefully they work for you. Using some more color theory, I also had to decide whether the labels and dividing line segments should be in black or white for each strip and circle. There are formulae and guidelines out there that give different weights to the RGB values of a color and let you decide mathematically whether a certain background color would look better with black or white text. I think the best indication of whether this was done well or not is to look at a thumbnail version of the worksheet to see if the numbers can still be read and I’m quite confident that this is the case. I also printed various versions to make sure they looked good on paper. In the fraction circles below, note that one has text and dividers in white and the other in black based on the background color.
Activities
Exploring fractions with strips can be done to discover equivalent fractions without cutting anything out, but a straight edge like a ruler is handy. The smart fraction strips facilitate this exploration as similar fractions are near to one another. Students simply look for fractional amounts that “line-up” and can see how these fractions must be worth the same as they take up exactly the same amount of each strip. For example, 1/2, 2/4, 3/6, 4/8, 5/10, 6/12 and 10/20 all line up on the fraction strip pages.
Overhead transparencies can be your best friend when it comes to comparing fraction strips or fraction circles. The idea is to have one copy on an overhead transparency and one copy on a piece of paper. Cutting out strips or circles from the transparency version is optional, but makes it easier to compare. Students simply position the transparency version over the paper version and compare various fractions. For example, if they were comparing sixths and ninths, they would position the sixths transparency over the ninths on the paper, line up the zero line (left most line on fraction strips and top vertical line that points north on the fraction circles) and see what matches. 2/6 = 3/9 and 4/6 = 6/9, in this case. How many equivalent fractions can they find on their own? Can they use these manipulatives to help them complete a comparing fractions worksheet? Non-permanent markers can also be used on the transparency or the black and white version to model different fractions.
Adding fractions generally involves cutting fraction strips and circles into individual sections, so they can be “fit together,” but overlapping is also a possibility. For example to add 2/5 and 3/10 and using the overhead transparency version cut up, students would line up the first two fifths sections left to right then place the first three tenths sections to the right of the fifths. A little tape will facilitate moving them around on a paper copy to see what two fifths and three tenths matches and they should find matches of 7/10 and 14/20.
Subtracting fractions is done in a similar way to adding fractions, but instead of arranging them all in one row (fraction strips), the original amount (the minuend) is arranged in the first row and the amount to be subtracted (the subtrahend) is placed in a second row, so that it aligns with the end of the first row. The gap at the beginning of the second row is the difference and gets compared to a paper copy. With fraction circles, the subtrahend overlaps the minuend and the sector that isn’t overlapped is the difference. Using 2/5 – 3/10, students would find that the difference would line up with 1/10 or 2/20.
Many other activities are possible such as determining combinations of two, three or four fractions (or more) with different denominators add up to one whole (or any other fraction); using folding to make fraction strips or circles (hint: halves, quarters and eighths are easy); using fraction circles to make pie charts; multiplying and dividing fractions; using fraction circles intact to make equal probability spinners or cut up to make weighted probability spinners; angle measurement to explore circle properties; creating games; using strips and circles for fractions greater than one; etc.